How to Set Up a Fishing Pole: Beginner to Advanced Step-by-Step Guide
Getting a new fishing rod is exciting, but knowing its basic use is crucial for successful fishing adventures. In my fishing experience, I have seen many anglers, especially beginners, who don’t know how to set up a fishing pole, which is why their rods are damaged very soon. That’s why proper knowledge of fishing pole setup is very important to avoid its damage.
When helping anglers and other beginners, one important point I noticed is that whenever we discuss the use of a fishing rod or reel, we often focus on complex ideas but forget basic knowledge of different fishing gear setups, which is very important.
In this article, I will demonstrate how I personally set up my fishing pole and guide you through it in a very simple way you will never forget. This article is for beginners or those looking to enhance their knowledge of fishing rod setup and will guide you through the complete process, from assembling the rod to setting the drag.
By reading this complete step-by-step beginners’ fishing rod setup guide article, you will be able to set up your fishing rod very effectively and smoothly.
Requirements for setting up a fishing pole
Fishing Rod Setup Diagram
Steps of Fishing Pole Setup
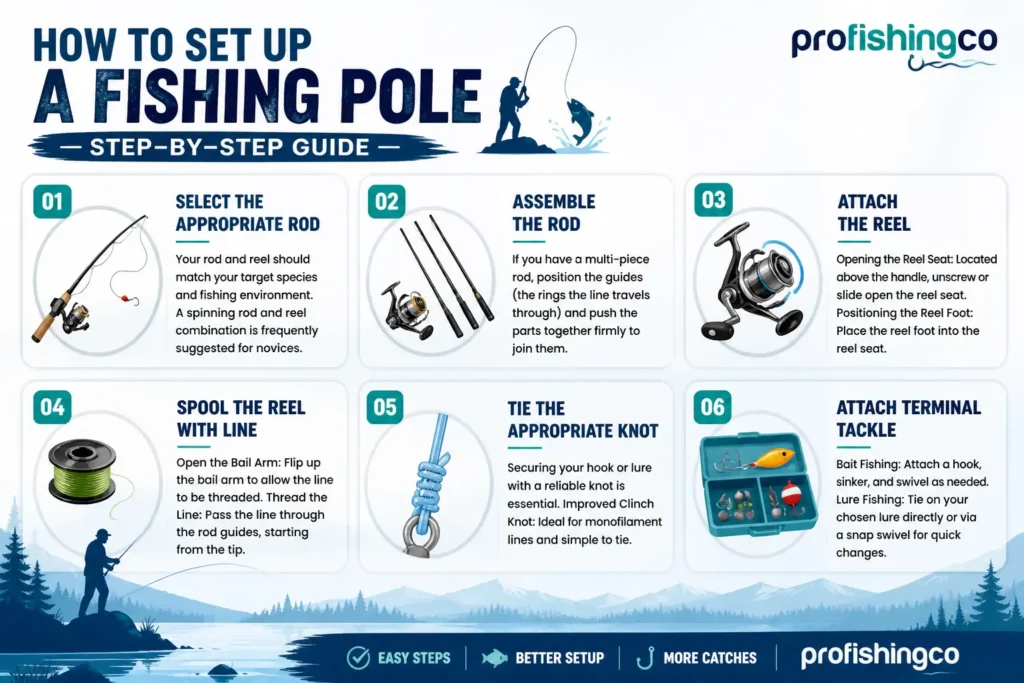
I will demonstrate the setup for a fishing rod in 7 simple steps.
1. Rod assembly
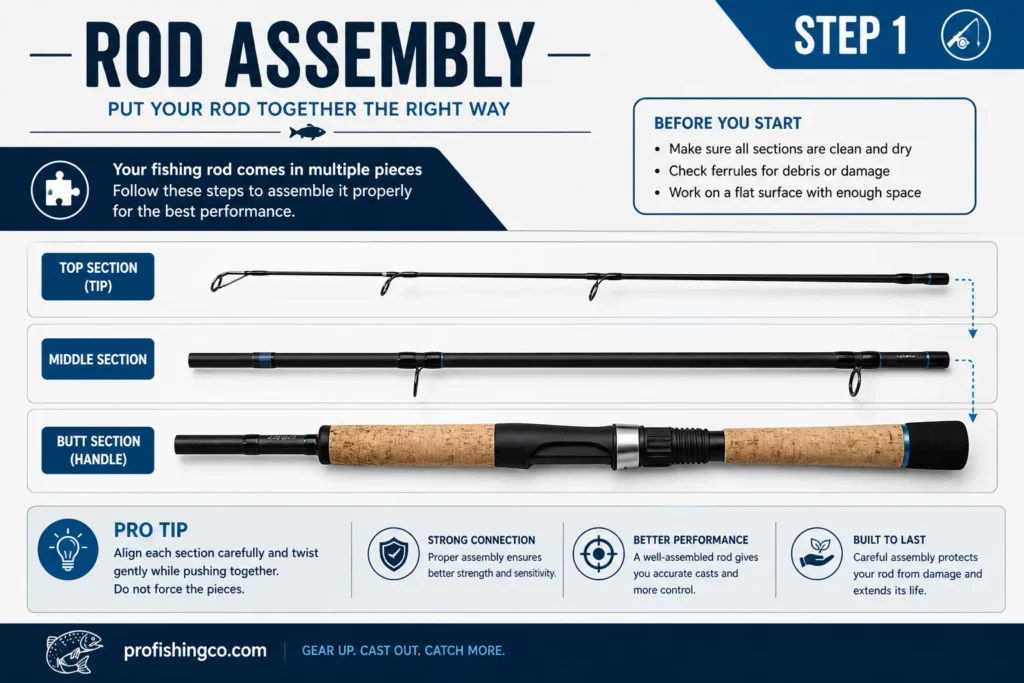
Many new fishing rods on the market are made of multiple pieces, so the first step is to join them.
Insert the bottom of the rod into the top section, ensuring it is firm and secure to prevent damage during use.
Next, check the eyelets (line guides); they must be properly positioned and aligned straight with the reel. Never apply pressure or grab the eyelets directly, as they will break.
2. Reel attachment to rod
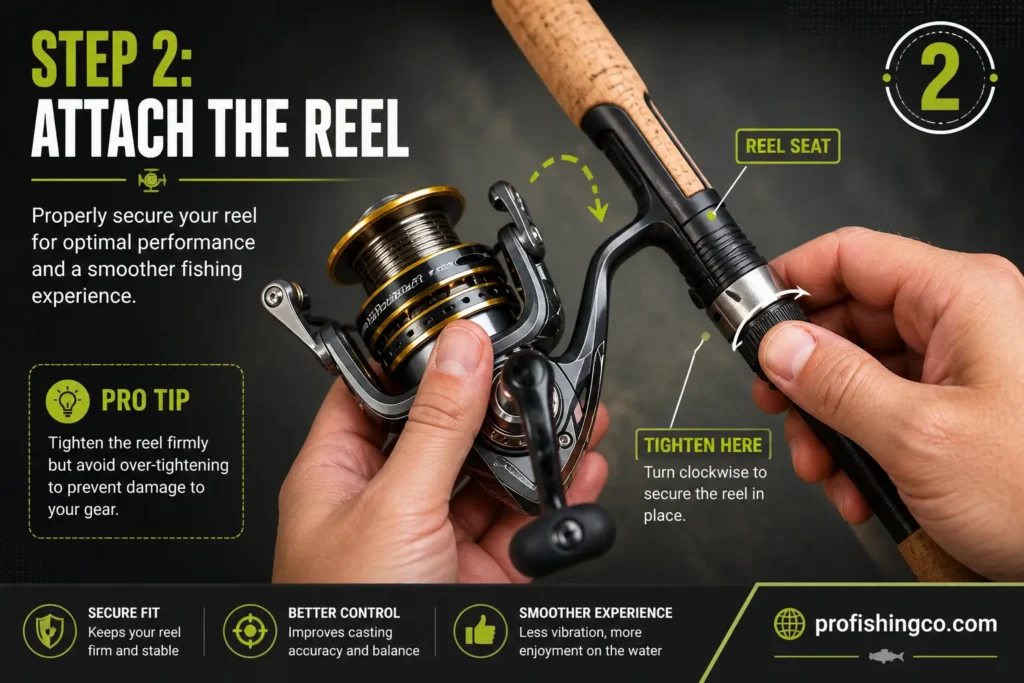
The next crucial step is to attach the reel to the rod correctly.
First, place the reel foot into the reel seat located on the handle of the rod, and then turn the locking ring until the reel is in the proper place. The reel should be placed at the bottom of the rod so that it can be easily used.
3. Selection of the right fishing line
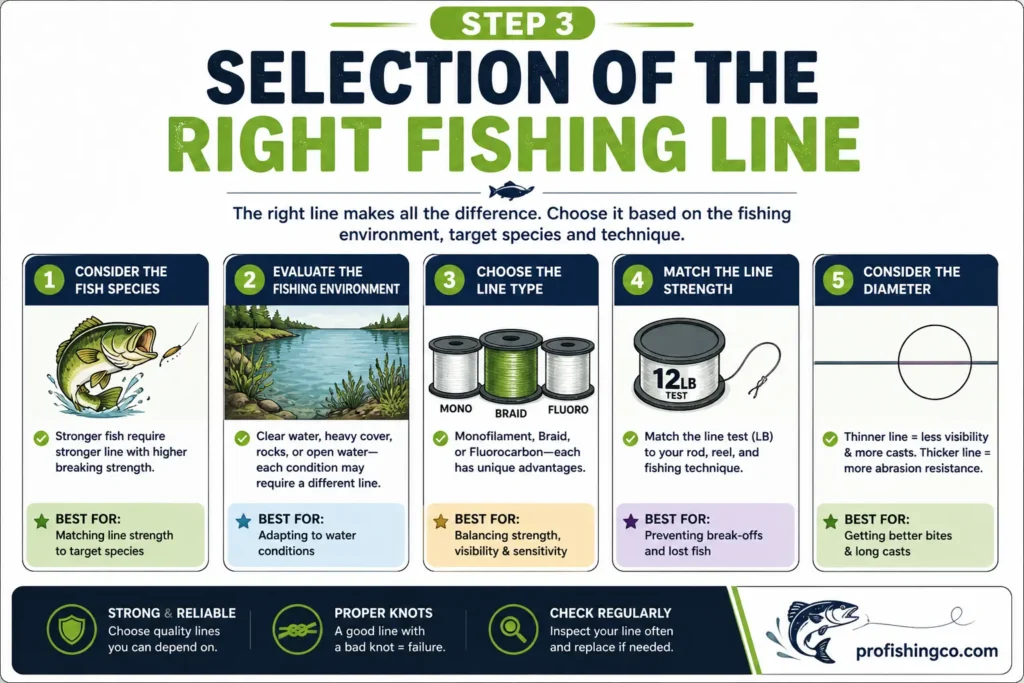
After placing the reel on the rod, select the right fishing line. Every rod has a label with the recommended line size, like my light-action rod, which suggests 4 to 12 pounds. This is my recommendation, but you can choose based on your preference.
After selecting the line, pass it through each eyelet starting from the one closest to the reel.
Sometimes, team members ask which fishing line I use. It depends on the situation. For toothy fish, I recommend 6 to 10 pounds of braided line. Many beginners use monofilament, but it breaks easily with toothy fish.
4. Spooling the Reel
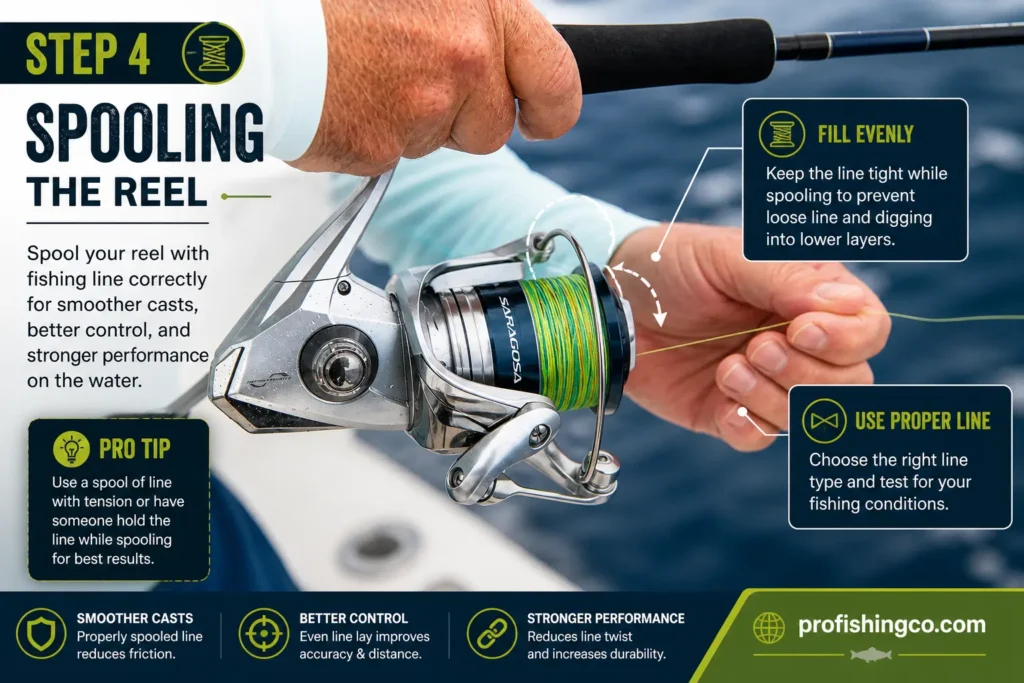
Spooling the reel is an important step in fishing pole setup, and most of the time, anglers make mistakes at this step, whether they are using mono, fluorocarbon, or braided line. Here, I will guide you on how to spool your reel professionally.
Before adding a new line to the spool, check if the line lies evenly. If there are more lines at the top than the bottom, add washers to balance it. If there is more at the bottom, remove extra washers.
Next, thread the line through the first eyelet of the rod, flip the bail open on the spinning reel, and secure the line to the spool arbor to ensure proper tension.
4.a. How to Tie the Arbor Knot
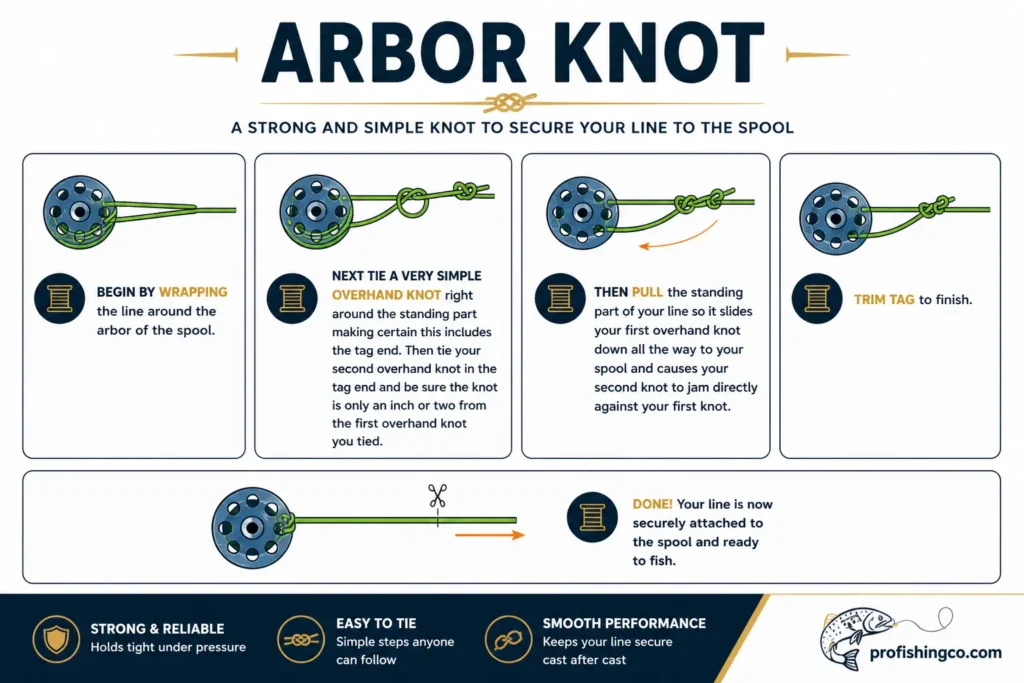
An arbor knot is a more secure way to tie the fishing line to the spool of any type of fishing reel, whether a spinning, baitcasting, or fly reel, regardless of whether you are using monofilament, fluorocarbon, or braided fishing line.
The arbor knots consist of two overhand knots, and they provide more strength than a simple overhand knot. One of our team members, Millen, also uses a uni knot to tie the fishing line to the reel, but I personally use the arbor knot technique.
Steps of Tying the Arbor Knot
Step 1: Wrap the line around the spool
Flipping open the bail, take the free end of your line, wrap it around the spool, and pull both ends to make it tight. Remember, both ends of the line should be in the same direction and parallel to each other.
Step 2: Form a loop at the end of the line
Start by tying a simple overhand knot on the line itself. You’ll notice that the main line passes through the larger loop formed by this knot. Once it’s in place, gently pull the tag end to fully tighten it.
After that, make another overhand knot on the short tag end. To do this, form a small loop and pass the end through it, crossing it over as you go. Pull it tight to secure it properly.
Step 3: Final Tightening and Securing the Knot
As you pull the fishing line, it will begin tightening around the spool. Keep reeling steadily until the knot settles firmly in place. You’ll notice the tag end getting shorter as both overhand knots pull together, locking into a strong arbor knot.
Once secure, trim the extra tag end. Before tightening any fishing knot, moisten it with saliva to reduce friction and ensure a smoother, stronger finish.
5. Loading the Line with Proper Tension
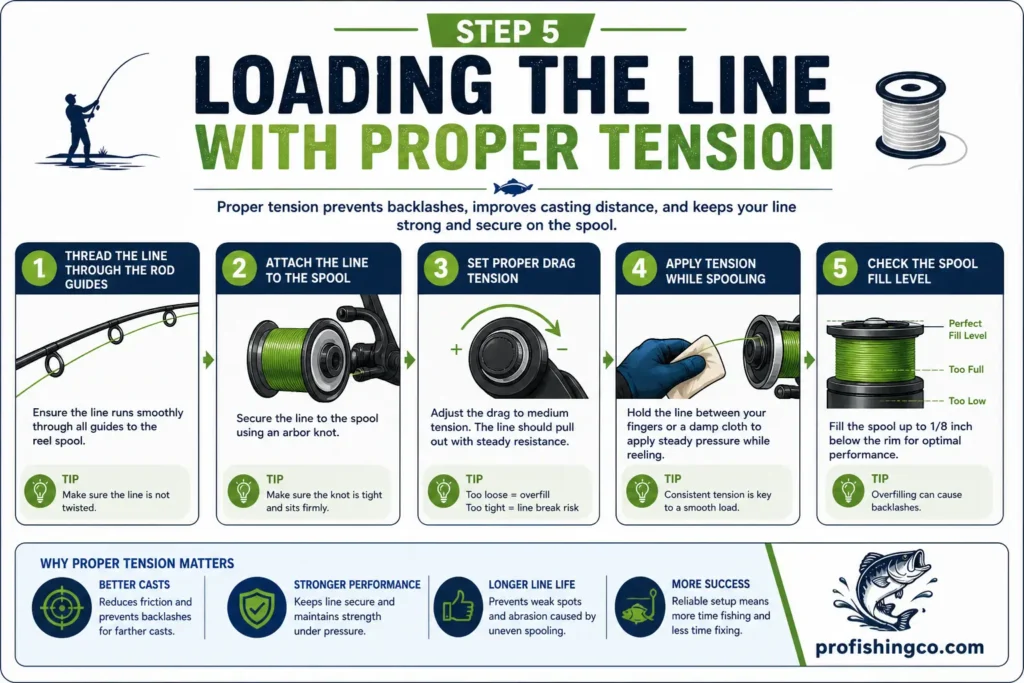
Loading the line with proper tension is critical for preventing tangling and improving casting.
First, pinch the line against the rod above the reel with your fingers while winding. This ensures tight coils and prevents tangles when casting.
Next, fill the reel until about an eighth of an inch (1/8″) of space remains on the spool rim. Over-spooling causes coils to overlap and spill over during casting, creating tangles.
6. Tying On Hardware: improved clinch knot
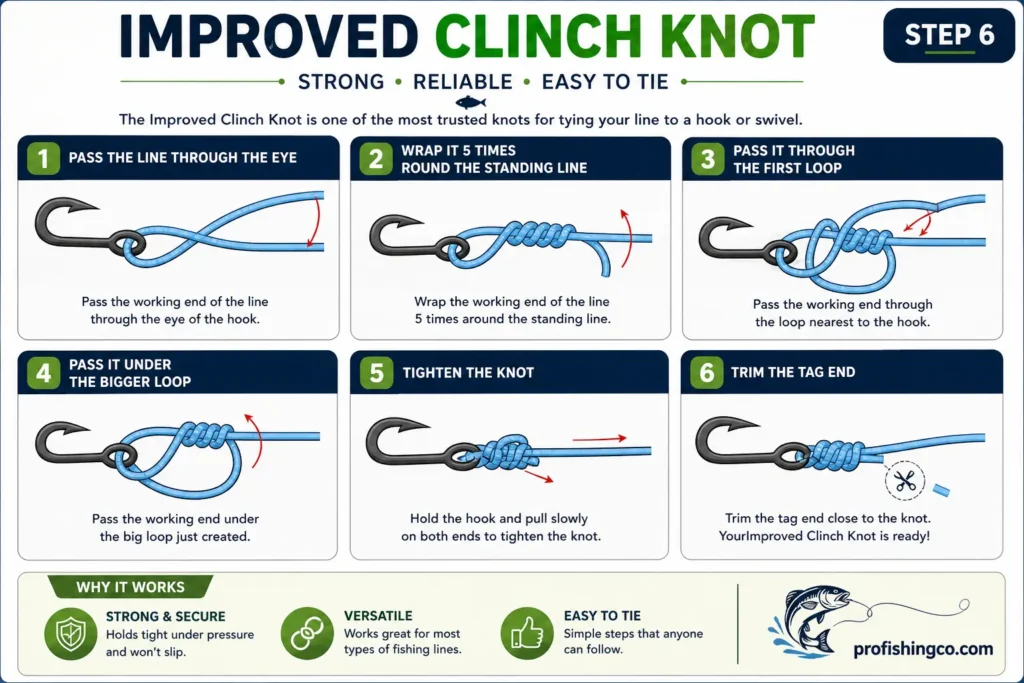
The improved clinch knot is now the most reliable and popular fishing knot for attaching fishing line to hardware like lures and hooks. It is more effective for small-diameter fishing lines, such as monofilament and fluorocarbon.
How to Tie the Clinch Knot
Step 1: tying on a hook/swivel
After the line is spooled up, pass the fishing line through the eye of the hook or swivel. I personally prefer to tie a swivel to the end of the line to avoid tangles.
Step 2: wrapping the tag end
Insert your finger through the loop near the hook eye, then take the loose end of the line and neatly coil it around the main line for 5 to 7 turns, keeping each wrap tight and even for a secure hold.
Step 3: Pass the tag end through the loop
Take the tag end of the line and pass it back through the small loop near the hook eye.
Step 4: Lubricate the knot
I personally lubricate the knots with saliva to keep them moist and to avoid friction and damage to the line.
Step 5: Tighten and Seat the Knot
Gently pull the main line and the hook in opposite directions, allowing the knot to slide down smoothly and settle firmly into place for a clean, secure finish.
Step 6: Trim the Excess Line
Carefully cut off the loose tag end using a pair of scissors or line clippers for a clean finish. Avoid using your teeth to prevent damage and ensure precision.
7. Adding Weights and Bobbers
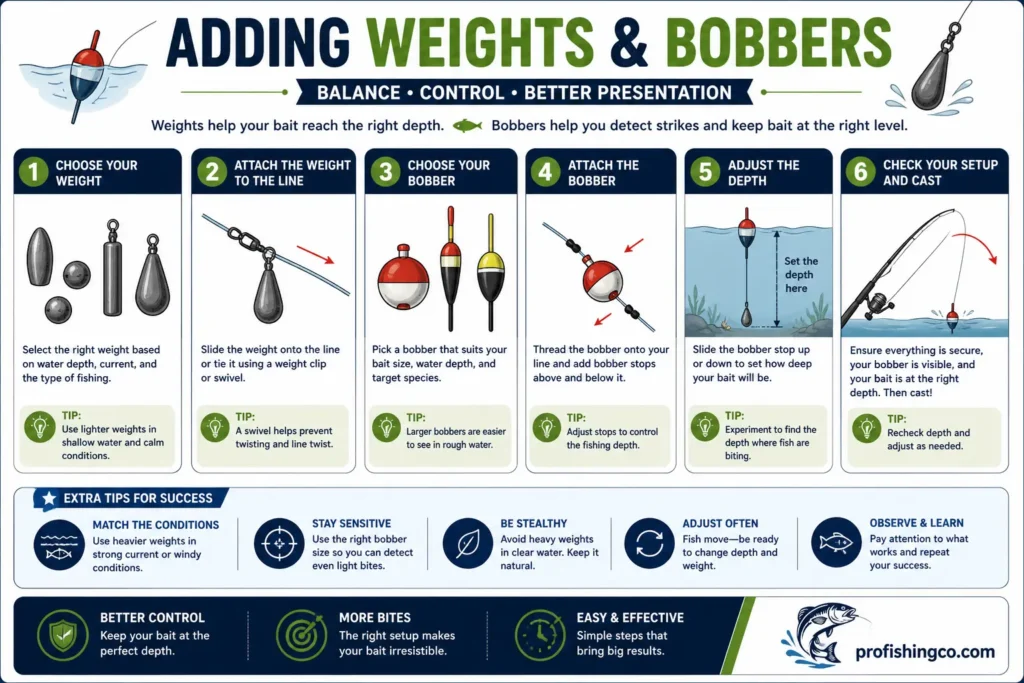
Adding weight (sinker) and bobbers (floats) helps suspend bait at a specific depth and enables accurate strikes.
Adding weights:
Add egg sinkers to pull the line vertically, but use enough weight without sinking the bobber. Never crimp weights with your teeth; always use fishing pliers to protect your teeth and the line.
Adding Bobbers:
Adding a bobber to the fishing line helps the bait stay at a specific depth and acts as a bite indicator, helping anglers determine its placement based on the fishing location.
Clip-On (Spring) Bobbers:
If fishing in shallow water like rivers, add a clip-on bobber. To set it up, press the spring-loaded top to reveal the hook, place the line into the notch, and release to lock it in place.
Slip Bobbers:
For deep water, a slip bobber is ideal and is set up differently from a clip-on bobber. First, pass the fishing line through the middle of the bobber, slide a bobber stop above it, then add a small bead before completing your setup.
FAQs
Conclusion:
This is my personal technique for setting up a fishing pole for various fish, including trout, catfish, bass, crappie, walleye, and salmon. By following this step-by-step method, you can easily and safely set up your rod without damaging it, even as a beginner.